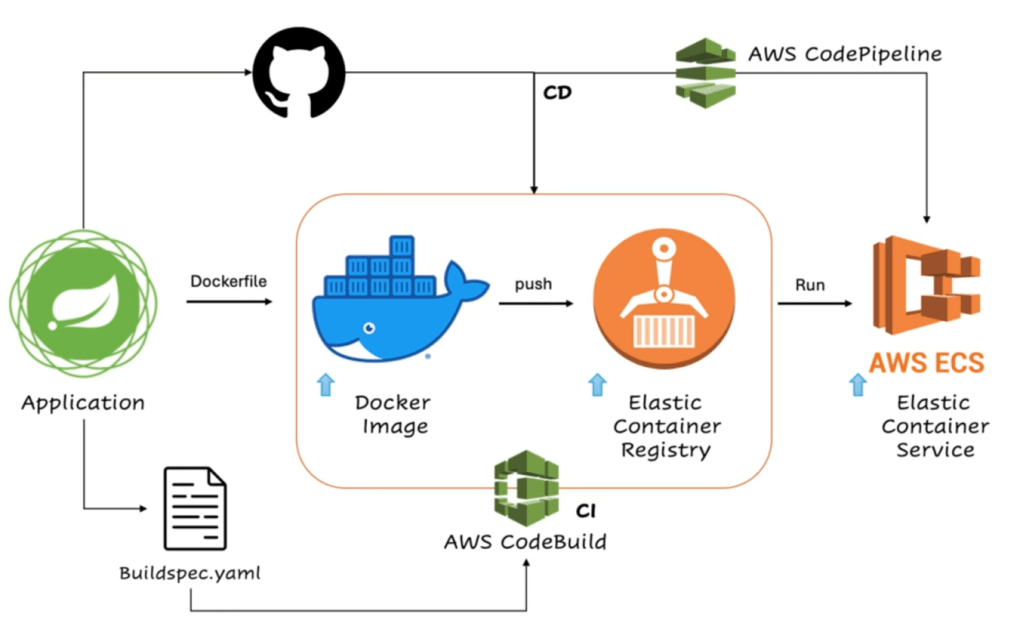
How to deploy springboot to ECS using CodeBuild and CodePipeline ?
Step 1:
Create a Docker file inside JAVA Springboot project and add this content
#Use the official OpenJDK 17 image from Docker Hub
FROM openjdk:17
#Set working directory inside the container
WORKDIR /app
#Copy the compiled Java application JAR file into the container
COPY ./target/course-service.jar /app
#Expose the port the Spring Boot application will run on
EXPOSE 8080
#Command to run the application
CMD ["java", "-jar", "course-service.jar"]
Step 2:
Create Elastic Content Registry at AWS Console.
- Got o ECR Registry at AWS Console
- Create repository
- Write a name for the repository. For an example, “java-registry”
Now we can see the created registry called “java-registry”
Step 3:
Need to create a buildspec.yaml file inside the project. This buildspec.yaml file will create the docker image and then push the image to the hub. Now need to define command for the buildspec.yaml file.
version: 0.2phases:pre_build:commands:- mvn clean install- echo Logging in to Amazon ECR…- aws --version- REPOSITORY_URI=339713037827.dkr.ecr.ap-south-1.amazonaws.com/javatechie-registry- aws ecr get-login-password --region ap-south-1 | docker login --username AWS --password-stdin $REPOSITORY_URI- COMMIT_HASH=$(echo $CODEBUILD_RESOLVED_SOURCE_VERSION | cut -c 1-7)- IMAGE_TAG=build-$(echo $CODEBUILD_BUILD_ID | awk -F":" '{print $2}')build:commands:- echo Build started on date- echo Building the Docker image…- docker build -t $REPOSITORY_URI:latest .- docker tag $REPOSITORY_URI:latest $REPOSITORY_URI:$IMAGE_TAGpost_build:commands:- echo Build completed on date- echo Pushing the Docker images…- docker push $REPOSITORY_URI:latest- docker push $REPOSITORY_URI:$IMAGE_TAG- echo Writing image definitions file…- printf '[{"name":"course-service","imageUri":"%s"}]' $REPOSITORY_URI:$IMAGE_TAG > imagedefinitions.json- echo Writing image definitions file…# add your container name- DOCKER_CONTAINER_NAME=java-registry- printf '[{"name":"%s","imageUri":"%s"}]' $DOCKER_CONTAINER_NAME $REPOSITORY_URI:$IMAGE_TAG > imagedefinitions.json- echo $DOCKER_CONTAINER_NAME- echo printing imagedefinitions.json- cat imagedefinitions.jsonartifacts:files:- imagedefinitions.json- target/course-service.jar
Step 4:
Now task for the AWS code build. Go to the code build at aws console.
- Create project
- Project name can be “course-project”
- Select a source provider from Source 1 primary. For an example, select GitHub from dropdown because our project is in at GitHub repository.
- Select the project from GitHub repository search box.
- Now create a role at the “Role name” input box. For examle: “course-app-service-role”
Step 5:
Now at the “Build spec” section, select “Use a build spec file” option because we are using created build spec file, we are not doing it manually.
Step 6:
Now press the button “Create build project”.
Now we go to this link:
Developer tools –> Code build –> build projects –> course project
Now we can see our primary repository and service role.
Step 7:
Now need to add rules for role. Go to the permission are by navigating service role directly.
- Click “add permission”
- select “attach policy”
- search “container” and then select “AmazonEC2ContainerRegistryFullAccess” and “AmazonEC2ContainerRegistryPowerUser” from the list.
- Now press “Add Permission button”
Step 8:
Now navigate here again:
Developer tools –> Code build –> build projects –> course project
Now press “start build” button.
Step 9:
After finish the successful build, we need to check image is pushed or not. Go to the repository and we can see that image is created successfully. There are 2 image create and 1 is with “latest” tag.
AWS code build is finish and continuous integration part is working.
Step 10:
Now go to “Elastic Container Service” from AWS Console.
- Create “task definition” after clicking “create task definition” button.
- name it “course-task”
- select launch type “AWS Fargate”
- select CPU and memory from dropdown. Example CPU – “.5vCPU” and memory – “1GB”
- “Container 1” section, need to add container registry name. add the name “java-registry”, copy the repository URI and past it at “image uri” input box.
- Add container port “8080” and select app protocol “HTTP”
- now click on create button
Step 11:
Now create a cluster. Name it “java-techie” cluster. Now select “AWS Fargate(Serverless).” Click create button. Now to the the “Cloud formation” and we can see the status. Cluster creation is complete.
Step 12:
Now click the cluster, it will take you to the cluster page. At application type section, select the created cluster. Write a service name at the input box “course-service-v2”.
Step 13:
Create new security group from “network” section and select “Allow all traffic”. select source “Anywhere”. select “All TCP” and again select “Allow all traffic”. Now click “create” button and after few miniutes we will see “course-service-v2” has been deployed successfully.
Step 14:
Now go to the “task” setion and you will see a public IP address. Through this public IP address, now can test REST API using post man or any other testing tool. So now application is running in AWS ECS successfully.
Step 15:
Now during application development, any time code changes, amazon code build should trigger and push the image to the registry and automatically deployment should happen. For this, we need to go to the “Primary web hook” section and check the option “Rebuild every time a code change is pushed to the repository”. Remove filter group and click the “update project” button.
Step 16:
Now do the code changes and push, we will see immediately build started and it will be build number 2.
